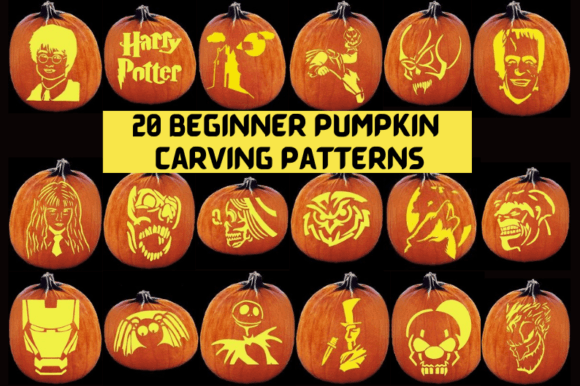
20 Beginner Pumpkin Carving Patterns
Halloween is more than just candy and costumes—it’s a chance to gather, create, and share joy through hands-on tradition. For many adults stepping into pumpkin carving for the first time—or returning after years—finding clear, well-designed, and truly beginner-friendly patterns can make all the difference between frustration and fun. That’s where 20 Beginner Pumpkin Carving Patterns stands out: a thoughtfully curated digital collection built not just for ease of use, but for real-world success at your kitchen table or craft station.
What It Is—and Why It Works for Real People
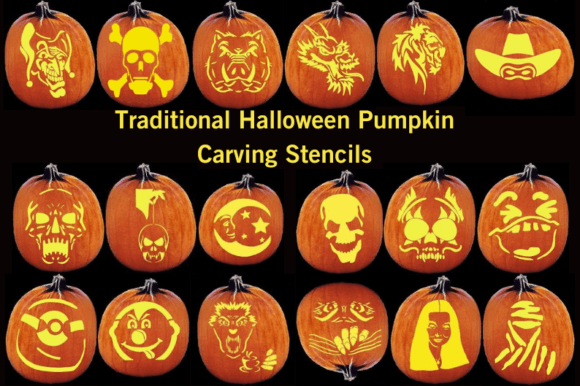
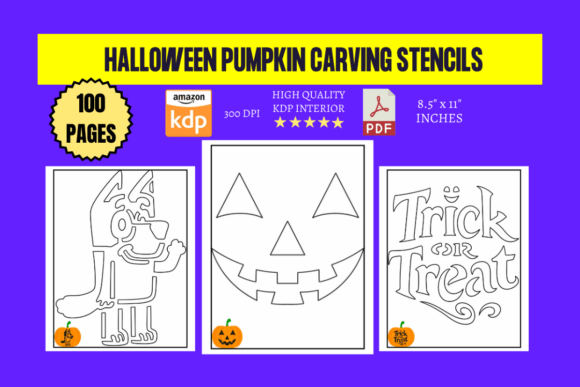
This isn’t a generic bundle of clipart or resized stock images. The 20 Beginner Pumpkin Carving Patterns PDF delivers 20 original, print-ready stencils—each sized precisely for standard 8.5″ x 11″ paper and rendered at 300 DPI for crisp, clean lines when printed or traced. Designs range from lighthearted (grinning cats, silly ghosts) to classically spooky (pointy-hatted witches, swooping bats, jagged-toothed jack-o’-lanterns), all drawn with carving in mind: bold outlines, generous negative space, and intentional simplification so even first-timers can translate them onto a pumpkin without second-guessing.
Crucially, it’s designed for *doing*, not just browsing. You don’t need design software, a Cricut, or prior art training. Just print, tape, trace with a pushpin or stylus, scoop, and carve. That practical focus—combined with instant digital delivery—is why educators use it in classrooms, small business owners adapt motifs for local events, and families return year after year.
A Common Misstep: Assuming “Beginner” Means “Simplified Too Much”
Some shoppers scan listings expecting cartoonish minimalism—and are disappointed when patterns include subtle texture, layered eyes, or expressive eyebrows. Others assume “beginner” means no planning required, then struggle because they skip tracing entirely and try to freehand from a phone screen.
Here’s what actually happens: Overly basic designs often lack visual personality, making pumpkins look flat or forgettable. And skipping the trace step? That leads to asymmetry, misaligned features, or cut lines that wander off the pumpkin’s curve—especially on uneven surfaces like ribbed or oblong gourds.
Better approach: Choose patterns that balance clarity with character—like the “Winking Witch” or “Grin & Glow Ghost” from this set. Then commit to the trace. Use masking tape to secure the stencil smoothly over the pumpkin’s surface, and go slow with your transfer tool. A steady hand beats speed every time.
Another Overlooked Detail: Print Quality and Paper Choice
You’ll get high-resolution JPGs—but resolution alone doesn’t guarantee success. If you print on thin, glossy photo paper, the stencil may curl or slip during tracing. If you use low-ink economy mode, faint lines won’t transfer cleanly.
We’ve seen users print on cardstock only to find the paper too stiff to conform to rounded pumpkin contours—or worse, use recycled paper with visible fibers that snag the pin and tear the pattern.
Try this instead: Print on standard 24–28 lb copy paper. It’s flexible enough to drape smoothly, sturdy enough to hold up to light pin pressure, and affordable enough to test multiple placements. And always do a quick test print of one pattern first—check line thickness and contrast before printing the full set.
The Digital Download Reality Check
This is a digital product. No physical stencils, no pre-cut templates, no pumpkins included. That’s intentional—and beneficial. It means no shipping delays, no inventory limits, and immediate access whether you’re prepping for a school event on Tuesday or last-minute decorating on Halloween Eve.
But that also means success depends on your setup. If your printer hasn’t been used in months, ink may be clogged. If you’re downloading on a tablet without a compatible PDF reader, the file might open blurry or zoom incorrectly.
Before you carve: Open the PDF on your device *before* printing. Scroll through all 20 pages. Confirm each image loads fully and displays sharp edges. If anything looks pixelated or cropped, re-download the file or try opening it in Adobe Acrobat (free) instead of a browser preview. And keep your printer’s maintenance cycle current—run a nozzle check if lines appear broken or inconsistent.
Why “20” Matters—Not More, Not Less
You might wonder why this set includes exactly 20 patterns—not 10, not 50. It’s deliberate. Ten wouldn’t offer enough variety across moods and skill progression. Fifty would overwhelm beginners with choice paralysis and dilute quality control.
These 20 were selected and refined through real user feedback: 5 for absolute first-timers (think “Three-Triangle Face”), 7 for those ready to add dimension (like “Layered Bat Wings” or “Floating Ghost with Shadow”), and 8 for confident beginners wanting subtle flair (“Candy Corn Smile,” “Moonlit Cat Silhouette”). Each builds quietly on the last—no jarring jumps in complexity.
Final Practical Checks Before You Begin
- Match the pattern to your pumpkin’s shape: Tall, narrow gourds suit vertical motifs (witches, ghosts); round, wide pumpkins handle symmetrical faces best. Avoid wide horizontal scenes on small pumpkins—they’ll crowd the surface.
- Lighting matters: Carve near a window or under bright, even light—not dim corners or flickering string lights. Shadows distort alignment.
- Use the right tools: A serrated grapefruit spoon works better than a metal scoop for removing pulp without gouging. A linoleum cutter or pumpkin-carving kit gives cleaner cuts than kitchen knives.
- Timing helps: Carve the night before Halloween—not the morning of. Pumpkins stay fresher longer when carved later, and you’ll avoid rushed decisions.
With 20 Beginner Pumpkin Carving Patterns, the goal isn’t perfection—it’s presence. It’s laughing with your kids as you both miss a line and turn it into a crooked smile. It’s sharing a finished ghost with neighbors and hearing, “Where did you get that?” It’s building a small, joyful ritual that feels yours—not mass-produced, not overly complicated, but genuinely made.
So print your favorite, pick a pumpkin with good walls and a flat base, and start simple. Let the first cut be slow. Let the second be steadier. By pattern #7, you’ll likely be flipping ahead—not to rush, but because you’re already imagining how you’ll personalize it next year.